
Join the BusinessForYou.Com
affiliate program!
FreeMailer2000 When you sign-up for Free, you will get your very own personalized FreeMailer2000 website along with your Unique URL. When someone signs-up from your FreeMailer2000 website, they become your First Level Downline. Similarly, when someone else signs-up from their Unique URL, they become your Second Level Downline and so on till 15 Levels. The trade off here is very light, only 14 people are able to send email to you in return.
Click here for information about webrings mastered by fjd1.com Webings are a great way to surf the web by topic, and a good method of getting your pages noticed for webmasters.
Trillium University maintains an archive at Ware.netfirms.com for software (and links to downloads) which you might find beneficial.


If you need professional help, send me an e-mail describing your needs and how to best contact you. Sincerely,
F. Davies
fjdavies@yahoo.com
(360) 352-0242
ICQ 43536012
2. Designing your site continued. Click here for the previous lesson. From our last lesson we had a web page entitled index.html with the following code:<!DOCTYPE HTML PUBLIC "-//W3C//DTD HTML 4.01 Transitional//EN" "http://www.w3.org/TR/html4/loose.dtd">
You should also have an images folder with a couple of images in it. Before beginning with the new code, copy your index.html page and name the this new copy as another.html (unlike your index page, this one really could be called anything you like as long as the name ends with either .htm or .html, but stick with another.html just for the sake of following the lesson as presented.) Now, let's begin with adding another line of text to our first page. On the line following Hello World lets add the words "From Me". And then on our other new page add the words "To You" instead (you can also change the title to indicate this is a new page, as you wish.) We now have two different pages, both in the same folder (YOURSITE). Test them each to be sure they are working. Did you notice that the text you added ("From Me") seems to appear on the same line as Hello World? As mentioned, the user agent (browser) treats a whole lot of white space as just one single solitary space. in order to force a new line we need to insert a tag which tells the browser to break to a new line. The break tag. This tag does not need to have an ending tag as it does not enclose any content. It could be simply written as:
<html>
<head>
<title> My first html page, Hello World </title>
</head>
<body>
Hello World
</body>
</html>
<br>
And that will work, but is not quite correct in XML (eXtensible Markup Language) and so a space and a (forward) slash are added, to indicate that this tag is its own closing tag, (sort of a shortcut, but more like better grammer.)<br />
So the body of your two pages should look like the following two:<body>
Hello World
<br />
From Me
</body>
<body>
Now we will add the code to make one page link to the other. This will be a pair of anchor tags enclosing something we want to be click on to initiate the link. Let us isolate the new line of text and make it what links the pages to each other. Add the following line to your first page, after the break and before the words "To You".
Hello World
<br />
To You
</body>
<a href ="another.html">
Note that we included the page we wanted to link to in that line of code. Follow the words "To You" with the closing anchor tag:
</a>
That should create a working link to your another.html page. Lets do nearly the same thing on your second page only this time the code will have its link set back to your original page index.html:
<a href ="index.html">
I like to usually close this all up as one line to eliminate extra spaces before and after the linked words:
To You
</a>
<a href ="index.html">To You</a>
Using this concept you can now create any number of pages and have any of them link to any other. For the majority of servers you might use, you will need to have an index.html page which acts as the default page for your site. (When you visit http://fjd1.com, the page you are taken to is really http://fjd1.com/index.html by default.) You may have any number of these links on a page, just be sure they are each properly ended with a closing anchor tag. Save and test these pages, making sure the links work. If they don't then check the code for exactness character by character. Speaking of characters, not all characters are okay to use. We have so far only used letters and spaces in the content itself. Let's now add to this the solution for the problem of making a few extra spaces. As you know, the extra spaces you might add seem to all get reduced down to a single space. (try adding in a few extra spaces between Hello and World, to see this in practice if you have not already.) The solution lies in special characters. These start with and ampersign (&) and end with a semicolen (;) and have their unique code or number between. Here is the code to create what is called a non-breaking space, (that is, a space which should not be treated like it was a proper place to jump or break to the next line down, a handy way of keeping two words together and on a single line.) Add this code for a non-breaking space anywhere to the content of your pages and it will add spaces till your heart's content:
To separate Hello and World. Then to spread out the word World you could write:
Hello
Note how this will show up in a browser window, and that the non breaking space prevents the word World from starting on a new line, even though we have written it on a separate line in our code now. (You noticed that did you? Good!)
W o r l d
Hello W o r l d
You should avoid typing in quotation marks directly, and instead use the following special character in their place when needed:"
As a matter of style, I prefer to use the double quote (two marks as opposed to a single mark) for the parts of code which must be in quotation marks such as the anchor tags where the name of the page goes. You are free to use the single quote in you content as it is used so often for contractions etc., ya' know? Please do not be luled into complancency by the FACT that on your pages it does not seem to matter, when you wish your content to have a double quote mark, type " instead. Here is the word Me in quotes.
"Me"
Perhaps even more important is the ampersign symbol, (the and symbol as some call it.) This too should never be included directly as content but instead you should type:
&
And absolutely you must use this for the < sign which is properly known at the less than symbol but also called the left angle bracket/brace or worse, (and kindda incorrectly) the left arrow:
<
And just as absolutely you must use this for the > sign which is properly known at the greater than symbol but also called the right angle bracket/brace or worse, (and kindda incorrectly) the right arrow:
>
So to write the word To enclosed within these angle brackets, you would need to write as html code:
<Too>
So add some text to both of your pages. (It really does not matter what you write for now, as you can always copy it elsewhere or replace it any time.) Just a few simple lines you can use to test your understanding of these few tags and special characters is all that is needed before proceeding. Try some really long lines so that you can get a feel for how the break tag works and how the non-breaking space character functions. Try putting several break tags in a row, followed by more text. You will notice that a single break tag does not cause an extra blank line, but that two are required to make a blank line. Here is a remake of the index.html page demonstrating these characters in use:
Transitional//EN" "http://www.w3.org/TR/html4/loose.dtd">
Here is how the above code looks when copied directly from above as viewed in a browser and then pasted directly into the source code of this page. (Everything between the body tags was copied and pasted.)
<html>
<head>
<title> My first html page, Hello World </title>
</head>
<body>
& Hello
W o r l d
<br />
<a href ="another.html">"Me" <Too></a>
</body>
</html>
& Hello
I should warn you that if you click on Me Too you will be sent to la la land as there is not a page to be found here with that name. Which brings up the point that links can be made relatively or absolutely depending upon your desires. If you want to link to this page from your page, you will need to write the full URL (Uniform Resource Locator) like this:
W o r l d
"Me" <Too><a href ="http://fjd1.com/instruction201.html">FJD1.com</a>
That code above looks like below this when parsed by your browser. (Note that I have used a shade of gray so that it will be easy to tell when I am demonstrating the actual effect as it is parsed or displayed by your browser. I am using a white background where I am showing the actual source document and the code as you might enter it in your text editor. There has been nothing in our lessons concerning color which you might have missed. We will address color etc. after first proceeding with putting images on your pages.) For those who once knew DOS this may seem redundant, but for those who do not the following my indeed help. If you wish to link to a file in a directory above the one which the page your are on is in, then you may proceed the name with ../ (two periods followed by a slash.) To link from the page: C:/MYWEB/MYSITE/index.html To the page: C:/MYWEB/MOMSSITE/linker.html You can write ../MOMSSITE/linker.html And to link to the page: C:/WEATHER/log.html You could write: ../../WEATHER/log.html As each ../ will cause the link to first exit out of the folder it is itself in and thus into its containing (more root like) directory. For now, try keep all of your pages in the same folder, and write your links as you have already learned earlier. It is possible to link to many different kinds of files also. (You might try linking to a text file you could make and locate in the same folder as your web pages.) Now let's add an image to your index.html (first) page. We will call our picture myphoto.jpg in the following example, so either rename your photo to match, or note where the file name is included in the following and change the file name to the name of the image you will use. This is the image tag, and like the break tag it should end with a space and a slash before the final greater than sign (right angle bracket.) Note; there must be a space between the img and src parts of the tag. Our image is in the images folder as you will remember, and that path must be included as shown here:<img src="images/myphoto.jpg">
Your page will be parsed from top down to bottom with text and other objects appearing one after another. To have your objects like images show up on their own line, a break may be added before and after the image. Let's do that, adding your image between the lines of text we already have and adding a break before and after. The code within (and including the) body tags should now look something like this:<body>
When parsed by your browser, your page now includes the image and should look something like this (below) with a line of text, a photo, and then our text link.
& Hello
W o r l d
<br />
<img src="images/myphoto.jpg" />
<br />
<a href ="another.html">"Me" <Too></a>
</body>
& Hello
Before continuing to our task of making an image the clickable part of a link, we may need to have some control over how big the image appears. We can do this inside our image tag by adding what are called attributes. We need to add an attribute for the height and width of our image. (Note; some browsers will distort an image if only one of these attributes are used so it is best to always include both, which also happens to improve the time it takes to parse as the browser.) The size of our current image is 200 pixels by 200 pixels, and the resolution is 150 pixels per inch. Let's shrink it just a bit down to 175 by 175 pixels by changing our image tag to include the width and height attributes. Note the use of quotes again around the numbers here and note to the order of width appearing before the height attribute:
W o r l d
"Me" <Too><img src="images/myphoto.jpg" width="150" height="150" />
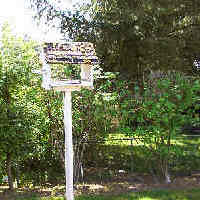
And here is how our image looks when parsed, now being just slightly smaller.But we still have another important attribute to add, the one which provides an alternate explanation of the picture. Often folks will have this text set to something other than an explanation of the image, but know that correctly it should be supplying and alternate text explanation of the photo, not directing the user to take some action. This attribute may be left empty between the quotes and this will prevent a validator from presenting you with a warning regarding a missing attribute. As this is a picture of my bird feeder, I will add this text explanation by including the alternative text attribute within the image tag like so:
<img src="images/myphoto.jpg" width="150" height="150"
Move your mouse (or cursor) over the image below and you will see that our text appears to tell us more about the picture.
alt="My bird feeder." />There are more attributes which can be used with the image tag, and there are many other attributes which can be used in a number of other tags. We can add a border around our image by adding the border attribute and including the size of the border. (A border can be set to zero as we will see shortly.) Here is the new image tag with the border width of 4:
<img src="images/myphoto.jpg" width="150" height="150"
This photo now has a border around it when parsed:
alt="My bird feeder." border="4" />Great! Now we will make it link to our other page (another.html) simply by enclosing it within a pair of anchor tags in the same manner we used for our text link earlier. Note that tags can enclose tags but you must nest them completely inside each other. just as the html tag encloses the body tags and they enclose the anchor tag, now the anchor tag encloses our image tag like this:
<a href ="another.html"> <img src="images/myphoto.jpg" width="150" height="150"
This now looks just like before, except that the border should be more dynamic and change colors to indicate that this image is an active link and your cursor may change from say a pointer to a hand (all depending of course upon the settings of the browser being used which may over ride our best efforts at times.) You will also be able to click on the image and the another.html page will displayed.
alt="My bird feeder." border="4" /> </a>
By changing the border to zero you can turn off this effect completely if you desire.
<a href ="another.html"> <img src="images/myphoto.jpg" width="150" height="150"
Once again it is without a border, yet still an active link looking like this when parsed:
alt="My bird feeder."
border="0" />
</a>
Let's conclude by listing the entire source code for the page we have created so far. Yours may vary a bit, but you should have the same basic nesting of tags with all of your content (text, images etc.) within the body tags. Here is ours:
<!DOCTYPE HTML PUBLIC "-//W3C//DTD HTML 4.01 Transitional//EN" "http://www.w3.org/TR/html4/loose.dtd">
Which we saw, parses into something like this:
<html>
<head>
<title> My first html page, Hello World </title>
</head>
<body>
& Hello
W o r l d
<br />
<a href ="another.html"> <img src="images/myphoto.jpg" width="150" height="150"
alt="My bird feeder."
border="0" />
</a>
<br />
<a href ="another.html">"Me" <Too></a>
</body>
</html>
& Hello W o r l d
So far you have learned about the proper way of creating an html beginning with the document type first, and then the html start and ending tags enclosing everything in between with the head section first and the body section following. The head and the body sections contain everything else with tags being nested nicely like the famous Russian dolls within dolls. You have also learned how to put simple text on a page and how to drop in an image sized to your desire and with or without a border of your desired thickness. You should now be able to write code to use text or images to link to other pages via an anchor tag. And have memorized the special characters for the double quote, the less than sign (left angle bracket), the greater than sign (right angle bracket), the ampersign (the and symbol), and the now infamous non-breaking space. In addition to also knowing the break tag, you should have learned the tags which are not used in pairs should end with a space and a forward slash just before they end with the greater than sign. It would be wise to practice by making several pages using all of these concepts just to get the feel for how these work beyond the example used here. Link them to each other and remember to take tiny steps, saving the file and refreshing your browser to check (debug) and see if everything is as expected before proceeding to add more content and code and images etc. Try a few, then venture on to the next lesson where you will learn a few more tags and attributes to help you gain more control of how a page is parsed. Remember too that pages will look different when viewed on different machines and using different browsers as there are three levels of control and the writer has access to only one of them, (the code which the coder writes, the others are the creators of the browser programs and the users themselves. This is necessary, especially for any who are sight-impaired in some way.) Click here to proceed to Web Page Design Lesson Number Three.
"Me" <Too>


